There’s a pattern among traders who pass their challenges and maintain funded accounts: many of them have developed advanced risk management techniques that go beyond the basics.
These practices aren’t about stop losses or position sizing alone.
They’re about adapting your risk management as conditions change, protecting what you’ve already earned, and knowing exactly when to be aggressive versus when to pull back.

Once you understand how experienced traders adjust their approach at different stages of a challenge, you’ll realize why some people pass Phase 1 but fail Phase 2, or why some traders hit profit targets only to give everything back the following week.
This lesson reveals practices that can help separate one-time passers from long-term funded traders.
Once you see how they work, you’ll understand why your approach may need to evolve as your account does.
Advanced Risk Management Practices

Assuming you understand the basics, these three advanced techniques can dramatically improve your odds of passing and staying funded.
1. The 50/30/20 Model (Progressive Risk Reduction)
What it is: A system that reduces your risk as you advance through challenges and get funded.
The concept: The further you get, the more you have to lose, so you should risk less at each stage.
How it works:
Let’s say you normally risk 1% per trade on a $100,000 account ($1,000 per trade).
Phase 1: Risk 50% of your normal amount:
- Risk: 0.5% per trade ($500)
- Why: You have the most room for error here. The goal is to hit +8% profit while staying under -10% drawdown. Being conservative early builds a cushion.
Phase 2: Risk 30% of your normal amount:
- Risk: 0.3% per trade ($300)
- Why: The profit target is lower (+5%), but so is your margin for error. You’ve come too far to blow it now.
Funded Account: Risk 20% of your normal amount:
- Risk: 0.2% per trade ($200)
- Why: You’ve made it! Now the goal is consistency and payouts, not proving yourself. Preserve your capital so you can withdraw profits monthly.
The psychology: This model forces you to trade smaller as the stakes get higher. It feels counterintuitive (you want to “go for it” when you’re close), but it’s exactly what keeps you alive.
2. Equity Curve Smoothing (Protecting Your Gains)
What it is: Lowering your risk after you’ve built up profits to avoid giving them back.
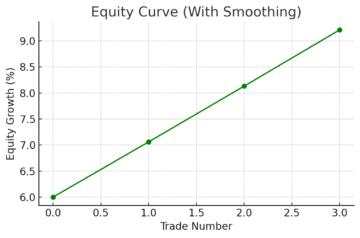
The problem it solves: Many traders hit +6% or +8%, then immediately lose -4% in a bad week. Their equity curve looks like a rollercoaster, showing big gains, big losses. Prop firms don’t like this.
What is an Equity Curve?
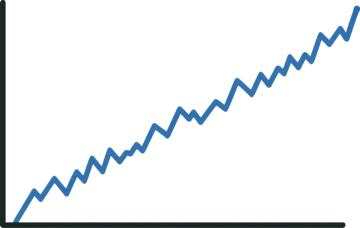
Your equity curve is simply a graph that shows your account balance over time.
- Going up = You’re making money (green line going upward)
- Going down = You’re losing money (red line going downward)
- Smooth curve = Consistent, controlled gains and losses
- Jagged curve = Wild swings, unpredictable results
Why it matters: Prop firms look at your equity curve. A smooth, steady climb signals discipline and skill. Wild ups and downs signal gambling and inconsistency. Even if you’re profitable, you might get flagged.
How it works:
Example scenario:
- You start Phase 1 with $100,000
- After two weeks, you’re up +6% ($106,000)
- You’re risking 0.5% per trade ($500)
What most traders do: Keep risking $500 per trade (still 0.5% of the original balance)
What consistent traders do: Recalculate risk based on the new balance
- New balance: $106,000
- New risk at 0.5%: $530… but actually, reduce it to $300-$400 (0.3-0.4%)
- Why: You’re ahead. Now you want to protect those gains and let small, steady wins carry you across the finish line.
The mindset shift: When you’re up, shift from “aggressive growth mode” to “capital preservation mode.” You’re no longer climbing—you’re protecting the summit.
Visual example:
Without smoothing: +6%, -3%, +4%, -2% = jagged, stressful curve
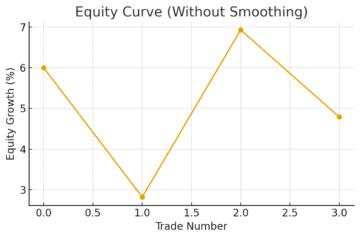
With smoothing: +6%, +1%, +1%, +1% = smooth, confident finish
3. Trade Filtering (Quality Over Quantity)
What it is: Being more selective about which trades you take when you’re close to your loss limits.
The concept: Not all setups are created equal. Some are “A+ slam dunks,” others are “B- maybe trades.” When you’re deep in drawdown or close to your daily limit, you can’t afford B- trades.
How it works:
Scenario 1: Fresh account (you’re at 0% drawdown):
- Take A+ setups: ✅
- Take B+ setups: ✅
- Take C setups: ❌ (still not worth it)
Scenario 2: You’re at -4% total drawdown (close to -5% daily limit):
- Take A+ setups ONLY: ✅
- Pass on everything else: ❌
Scenario 3: You’re at -8% total drawdown (close to -10% max):
- Take A+++ setups ONLY (perfect conditions, perfect confluence): ✅
- Pass on literally everything else: ❌
- Consider taking a break for the day/week: ✅
What defines an “A+ setup”?
- Aligns with your tested strategy perfectly.
- Multiple confirmations (indicators, price action, volume).
- Clear risk-reward (at least 1:2).
- Clean stop loss placement.
- You feel confident, not desperate.
What to avoid when filtering:
- Revenge trading (“I need to make this back NOW”)
- FOMO trades (“Everyone’s buying, I should too”)
- Marginal setups (“It’s close enough to my strategy”)
- Forcing trades (“I haven’t traded in two days, I should do something”)
Conservation Mode
All three of these techniques have one thing in common: they conserve your risk capital.
Think of your allowed drawdown as a resource:
- You start with a 10% budget.
- Every trade spends some of that budget.
- These techniques make sure you don’t waste it on low-probability situations.
The traders who pass aren’t the ones taking the most trades. They’re the ones taking the right trades, at the right size, at the right time.
Trader Case Studies: Learn From Their Mistakes (and Wins)
Case Study A: The Over-Risker (What NOT to Do)
What happened:
- This trader risked 2% of their account on every single trade.
- They hit three losing trades in one day.
- Total loss: -6% → Failed the challenge immediately!
What went wrong: With a typical 5% daily loss limit, just three bad trades wiped them out. One rough morning was all it took.
The fix: If they had risked only 0.5% per trade instead, those same three losses would have cost them just -1.5%. They’d still be in the game.
💡 Key Lesson: Prop firms have strict rules that punish oversized positions. Smaller risk per trade = more room for error = higher survival rate.
Case Study B: The Grinder (The Steady Winner)
What happened:
- This trader risked just 0.5% per trade
- Over time, they took 40 total trades:
- 20 winning trades (using a 1:2 risk-reward ratio).
- 20 losing trades.
- Net result: +10% profit → Passed Phase 1
Why it worked: Even with a 50/50 win rate (not impressive!), their disciplined 1:2 risk-reward ratio made them profitable. When they won, they made twice what they lost.
💡 Key Lesson: You don’t need to be a genius trader. Consistency and good risk-reward ratios beat trying to hit home runs. Slow and steady wins the race.
Case Study C: The Smooth Operator (The Smart Protector)
What happened:
- Trader quickly built up a +6% profit (great start!)
- Instead of getting greedy, they reduced their risk per trade from 1% down to 0.25%
- Protected their gains and passed Phase 2 without stress
Why this is small: Once you’re ahead, the goal shifts from “make money” to “don’t lose what you’ve made.” By cutting risk to just 0.25%, even a bad losing streak couldn’t wipe out their progress.
The psychology: This trader understood: it’s easier to pass with small, safe trades when you’re already profitable than to risk it all chasing bigger gains.
💡 Key Lesson: After building profits, reduce your risk. Lock in your progress and cruise to the finish line. Protecting gains is just as important as making them.
What These Traders Teach Us
| Trader Type | Risk Per Trade | Result | Main Takeaway |
|---|---|---|---|
| The Over-Risker | 2% | Failed in one day | Too much risk = quick elimination |
| The Grinder | 0.5% | Passed with a 50% win rate | Consistency + good RR = success |
| The Smooth Operator | Started at 1%, dropped to 0.25% | Passed easily | Reduce risk after gains |
The pattern is clear: Smaller risk, better discipline, and patience consistently beat aggressive trading.
Key Takeaways

The Counterintuitive Truth: Risk less as you get closer to success, not more. The 50/30/20 Model (0.5% in Phase 1 → 0.3% in Phase 2 → 0.2% when funded) keeps you alive when the stakes are highest.
Protect What You’ve Earned: Once you’re up 5-6%, shift from growth mode to preservation mode. Reduce your risk per trade to lock in gains. A smooth equity curve matters more than dramatic wins.
Quality Beats Quantity: When you’re deep in drawdown or near your daily limit, only take A+ setups. Your drawdown allowance is a limited resource. Don’t waste it on marginal trades.
The Math Doesn’t Lie: You don’t need a 70% win rate. A 50% win rate with a 1:2 risk-reward ratio and 0.5% risk per trade is enough to pass. Consistency beats brilliance.
Learn From Failure: Risking 2% per trade means three losses = -6% = instant failure. Risking 0.5% per trade means three losses = -1.5% = you’re still in the game.
The Real Game: Prop firms aren’t testing how much you can make….they’re testing if you can avoid blowing up. The traders who pass aren’t the most aggressive; they’re the most disciplined.
Your Action Step: Before your next trade, ask yourself: “Am I in aggressive growth mode or capital preservation mode?” Your risk size should match your answer.

Để lại tin nhắn của bạn ngay bây giờ